


LightningChart JS TraderUsing High Low Bands Indicator for Trading
ArticleExplore the High Low bands indicator theory and technical implementation.
Written by a human | Updated on April 24th, 2025
Introduction to High Low Bands Indicators
In the world of financial trading, technical indicators play a vital role in helping traders make informed decisions based on market data. One of these indicators, the High and Low Bands Indicator, provides a valuable tool for understanding price volatility and market movements. It is essential for traders looking to develop efficient trading strategies to fully grasp how indicators like these work.
This article explores the High and Low Bands Indicator in depth, focusing on its definition, usage in technical analysis, and specific applications using LightningChart JS Trader. Moreover, the differences between High-Low Bands and more popular indicators, such as Bollinger Bands, will be explained to clear any confusion between the two.
Definition and Importance for Traders
The High Low Bands Indicator is a technical analysis tool used by traders to identify potential buy and sell signals based on price volatility. High Low Bands indicators are plotted as bands that sit above and below a moving average. These bands are typically drawn using a certain percentage of the triangular moving average (TMA), which is known for smoothing out price fluctuations more effectively than simple moving averages (SMA) used in other indicators like Bollinger Bands.
The importance of High and Low Bands lies in their ability to provide traders with a clear picture of market volatility. They are particularly useful for identifying market extremes, such as overbought or oversold conditions, and can be used to find potential reversal points. This makes them invaluable for traders who rely on technical analysis to make decisions.
How Are High Low Bands Indicators Used in Technical Analysis?
High and Low Bands are employed in several ways to enhance a trader’s technical analysis:
- Tracking Market Movements: High Low Bands indicators provide a visual representation of price action by tracking the highest and lowest prices over a set period. Traders can easily see when the market is nearing these extremes, allowing them to anticipate potential breakouts or reversals.
- Identifying Trends: A key strength of this indicator is its ability to highlight the general direction of the market. When prices consistently touch or move outside the upper or lower bands, it suggests a strong trend in that direction. Conversely, when prices remain within the bands for an extended period, it may indicate consolidation or a sideways market.
- Measuring Market Volatility: The distance between the upper and lower bands expands during periods of high volatility and contracts during periods of low volatility. This helps traders assess the level of risk and adjust their strategies accordingly.
Support and Resistance Levels: High Low Bands indicators can also act as dynamic support and resistance levels. When the price touches the upper band, it may indicate that the asset is reaching a resistance level, whereas touching the lower band might signal a support level.
How Do High and Low Bands Work?
Mathematical Basis Behind the High Low Bands Indicator
The bands are generally plotted using a Triangular Moving Average (TMA) as the basis, and the high and low bands are calculated by adding and subtracting a specific percentage (or multiplier) of the TMA. Let’s break this down:
Step 1: Triangular Moving Average (TMA):
The TMA is a weighted moving average where the middle data points are given more weight than the data at the beginning and end of the period. To calculate it, you average the prices for a set period, and then average the result over the same period.

Step 2: High Band:
The high band is calculated by adding a fixed percentage or a multiplier to the TMA. This percentage represents how far above the TMA the high band will be plotted.

Step 3: Low Band:
Similarly, the low band is calculated by subtracting a fixed percentage or multiplier from the TMA, determining how far below the TMA the low band will be plotted.

Example Calculation:
Let’s go through a practical example using these formulas.
Step 1: Calculate the Triangular Moving Average (TMA). Assume you are looking at a stock with the following closing prices for the last 5 days:

First, calculate the simple moving average (SMA) for each day, using a 5-day period:
SMA Day 1 = (100+102+104+106+108) / 5 = 104
Now, calculate the TMA by averaging the SMA values for each day: Since we only have one 5-day period, the TMA would just equal the SMA in this case:
TMA = 104
Step 2: Calculate the High and Low Bands
Let’s say the percentage multiplier is set at 5% (0.05). This means the bands will be 5% above and below the TMA.
- High Band:
High Band = 104 + (104 * 0.05) = 104 + 5.2 = 109.2
- Low Band:
Low Band = 104 + (104 * 0.05) = 104 – 5.2 = 98.8
In this example, the High Band is 109.2 and the Low Band is 98.8. This means that if the price moves above 109.2, it may indicate that the stock is overbought and could be heading for a reversal. If the price moves below 98.8, it could indicate an oversold condition. The bands expand as volatility increases and contract when the market is calm, helping traders spot breakouts or potential reversals.
In LightningChart JS Trader, this calculation would be automated, allowing for real-time adjustments based on live price data. The trader sets the percentage for the bands, and the software continuously updates the high and low bands as the TMA evolves.
High and Low Bands vs. Bollinger Bands: Key Differences
While both the High and Low Bands Indicator and the Bollinger Bands Indicator are used for tracking market volatility, identifying trends, and signaling potential price reversals, they differ significantly in their underlying calculations and the information they provide to traders. Understanding these differences is crucial for selecting the right tool for your trading strategy.
Moving Average Type
- High and Low Bands Indicator: This indicator is based on a Triangular Moving Average (TMA), which gives more weight to the middle portion of the data set. The TMA smooths out the price action more effectively than simple moving averages, which is useful in removing short-term price fluctuations.
- Bollinger Bands Indicator: In contrast, Bollinger Bands use a Simple Moving Average (SMA) as the base. The SMA gives equal weight to all data points in the period, making it more sensitive to sudden price changes compared to the TMA.
Calculation of the Bands
- High and Low Bands Indicator: The bands are created by adding and subtracting a fixed percentage (or multiplier) from the TMA. This percentage is usually predefined by the trader, allowing for some flexibility depending on market conditions. The distance between the upper and lower bands remains constant unless the percentage is adjusted manually by the trader.
- Bollinger Bands Indicator: Bollinger Bands are more dynamic because they are based on the standard deviation of the price data. The upper and lower bands are calculated by adding and subtracting a multiple (usually 2) of the standard deviation from the SMA. The key difference is that Bollinger Bands automatically adjust to changing market conditions: the bands widen during periods of high volatility and contract during periods of low volatility.
Volatility Measurement
- High and Low Bands Indicator: High and Low Bands give traders a fixed range for price action, determined by the percentage chosen by the trader. While the indicator can be effective for identifying breakouts or reversals, it may not dynamically adjust to sudden changes in market volatility unless the trader manually modifies the settings.
- Bollinger Bands Indicator: The automatic adjustment to market volatility is one of the strengths of Bollinger Bands. Since the width of the bands depends on the standard deviation, the indicator becomes highly responsive to real-time changes in volatility, offering more adaptive insights into market conditions.
Interpretation in Trading
- High and Low Bands Indicator: Since the bands are a fixed percentage above and below the TMA, the indicator is more useful for providing steady support and resistance levels. Traders often use High and Low Bands in trending markets or periods of low volatility when fixed boundaries are preferable for identifying overbought and oversold conditions.
- Bollinger Bands Indicator: Bollinger Bands are more commonly used in volatile markets where prices are more likely to experience sudden fluctuations. The expanding and contracting bands offer traders real-time insights into whether the market is in a high- or low-volatility phase, making this indicator more suitable for short-term or intraday traders looking to capitalize on quick price movements.
Application in Different Markets
- High and Low Bands Indicator: This indicator tends to be more effective in stable or trending markets, where prices don’t fluctuate wildly. The fixed distance between the upper and lower bands makes it easy for traders to identify consistent patterns and signals over a longer period of time.
- Bollinger Bands Indicator: Bollinger Bands are more widely used in volatile or choppy markets, where prices are more unpredictable. The ability of the bands to adjust dynamically to market conditions makes them more versatile for various trading environments, especially for traders looking to take advantage of short-term price swings.
Key Differences Summarized:
Both indicators serve distinct purposes and are designed for different market conditions. High Low Bands indicator are favoured by traders who need fixed boundaries and steady support/resistance levels, particularly in trending or stable markets. On the other hand, Bollinger Bands are more dynamic and adaptive, making them an excellent choice for traders dealing with volatile or fast-moving markets. By understanding the unique features of each, traders can select the best indicator to complement their trading style and objectives.
In LightningChart JS Trader, traders can choose between High Low Bands indicator or Bollinger Bands, depending on the specific market conditions they are analysing. The platform’s advanced charting capabilities allow for real-time adjustments, making it a versatile tool for a wide range of technical analysis needs.
The Role of LightningChart JS Trader in Financial Analysis

Financial analysis involves examining historical data to forecast future trends, make informed decisions, and assess risk. In this domain, applications like LightningChart JS Trader serve a critical role by providing real-time, high-performance data visualization tools that help traders and analysts better interpret complex datasets. It enables traders to track market trends using built-in indicators.
The platform’s ability to handle large datasets and real-time updates makes it essential for fast decision-making in dynamic markets. Additionally, its customization options allow users to create tailored charts and apply statistical indicators, enhancing both the precision of analysis and risk management. This tool helps streamline financial analysis and supports more informed, data-driven trading strategies.
How to Create the High Low Bands Indicator Using LightningChart JS Trader
Advanced charting platforms like LightningChart JS offer traders a range of technical indicators, including the High Low Bands indicator. LightningChart JS allows traders to create interactive, high-performance charts, ensuring real-time data visualization. This platform is particularly useful for traders who rely on technical indicators such as the High Low Bands indicator to make quick, informed decisions.
Step 1: Get LightningChart JS Trader
To begin, you’ll need access to LightningChart JS Trader. This library provides the tools necessary to create advanced technical indicators, including the High Low Bands indicator. Visit the LightningChart JS Trader page to download the required components and to review the documentation.
Step 2: Review the Interactive Example
LightningChart JS Trader includes interactive examples that demonstrate how to create custom technical indicators. Start by reviewing the documentation, focusing on how to integrate High Low Bands indicator into your chart setup. The interactive examples will guide you through the process of setting up the High Low Bands indicator, from importing the necessary modules to modify the chart settings.
Step 3: Code Explanation
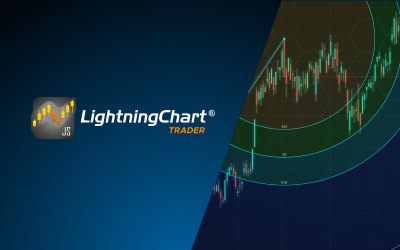
In this step, we will break down the code that creates the chart with the High Low Bands indicator, as shown in the image, using LightningChart JS Trader. The code demonstrates how to initialize a trading chart, apply the High Low Bands indicator, and customize its appearance.

Here’s a detailed breakdown of each section:
A. Importing the Required Libraries:
   const lcjsTrader = require('@arction/lcjs-trader')
   const lcjs = require('@arction/lcjs')
const { Themes } = lcjs- lcjsTrader: This library provides access to the LightningChart JS Trader functionalities, allowing you to create advanced financial charts.
- lcjs: The main LightningChart JS library is used for general charting functionality.
- Themes: A property within lcjs that provides access to pre-built themes. In this case, we are using the
darkGoldtheme to style the chart.
B. Initializing the Trading Chart:
lcjsTrader.trader(TRADER_LICENSE).then(async (trader) => {
    // Create a trading chart.
const tradingChart = trader.tradingChart({ loadFromStorage: false, colorTheme: Themes.darkGold })- trader(TRADER_LICENSE): Initializes the LightningChart JS Trader with the provided license key (TRADER_LICENSE). This is required to access the charting functionalities for financial data.
Note you can request a LightningChart JS Trader trial license, which is free.
tradingChart(): This function creates a trading chart with certain options. In this example:
loadFromStorage: false: This disables the loading of previously stored chart data from local storage, ensuring a fresh chart setup.colorTheme: Themes.darkGold: This applies the darkGold theme to the chart which influences the background color, grid lines, and other visual elements.
C. Adding and Customizing the Indicator
    // Add a High and Low Bands Indicator
    const hlb = tradingChart.indicators().addHighLowBands()
    hlb.setPeriodCount(10)
    hlb.setPercentage(5)
    hlb.setLineColor('#FFFF00')
hlb.setLineWidth(2)addHighLowBands(): Consisting of three lines: a Triangular Moving Average line, upper and lower band lines based on specific percentage of the TMA line. High Low Bands can be used to identify bullish and bearish trends.
setPeriodCount(10): This method sets the period over which the high and low prices are calculated. Here, the period is set to 10, meaning the indicator will consider the highest and lowest price over the past 10 data points.
setPercentage(5): This method adjusts the percentage width of the bands. A 5% percentage indicates that the bands will expand or contract by 5% above the highest and below the lowest prices, creating a buffer zone around the price action.
setLineColor('#FFFF00'): This sets the color of the lines representing the high and low bands to yellow (#FFFF00). Choosing a bright color like yellow helps the indicator lines stand out visually on the chart.
setLineWidth(2): This increases the thickness of the bands’ lines to 2 pixels, making them more prominent and easier to see on the chart.
D. Loading Data from a CSV File
    // Reading data from a file.
    await fetch(`${document.head.baseURI}examples/assets/0000/Alphabet Inc (GOOGL).csv`).then((res) => res.text()).then((text) => {
        tradingChart.readCsvString(text, 'Alphabet Inc (GOOGL)')
})fetch(): This function retrieves a CSV file containing historical data for Alphabet Inc. (GOOGL). The CSV file includes pricing information for the company’s stock, which is plotted on the chart.
readCsvString(): This function reads the CSV data and interprets it as pricing data for Alphabet Inc. The second argument (‘Alphabet Inc (GOOGL)’) sets the label for the chart, as seen at the top of the chart image.
E. Setting the Currency for the Chart
    tradingChart.setCurrency('USD')
})setCurrency('USD'): This sets the currency of the chart to USD, ensuring that the pricing data is interpreted and displayed in US dollars.
Advantages and Limitations of High Low Bands Indicators
Advantages
- Easy to Use: The indicator is easy to implement, especially in platforms like LightningChart JS Trader, which supports real-time updates and customizable chart options.
- Volatility Detection: High and Low Bands are especially useful for detecting periods of heightened volatility, allowing traders to adjust their strategies accordingly.
- Support and Resistance: The bands can act as dynamic support and resistance levels, offering traders insight into where the market might reverse or pause.
- Trend Identification: It helps in determining strong market trends by visualizing how the price interacts with the bands.
Limitations
- False Signals in Low Volatility: In markets with low volatility, the bands can give false breakout or reversal signals, leading traders to act prematurely.
- Lagging Indicator: Since the bands are based on historical data (moving averages), they tend to lag behind real-time price action. This may result in delayed signals for traders who need to make fast decisions.
- Best in Trending Markets: While useful in trending markets, the High and Low Bands Indicator can be less reliable in sideways or highly choppy markets where the price oscillates frequently within the bands.
Use Cases for High and Low Bands
Volatile Markets: In highly volatile markets, the High and Low Bands Indicator shines. When the market experiences rapid price swings, the bands provide traders with a clear boundary for price action, helping them gauge whether the asset is overbought or oversold.
Sideways Markets: The indicator is also useful in sideways or consolidating markets, where it helps traders anticipate potential breakouts. When prices consistently touch the upper or lower bands without crossing them, it may signal that the market is preparing for a significant move.
Conclusion
The High and Low Bands Indicator is an indispensable tool for traders looking to gain insights into market trends, volatility, and potential support and resistance levels. By offering a dynamic way to track market movements, this indicator is well-suited for a variety of trading strategies, especially in volatile and trending markets.
LightningChart JS Trader enhances the utility of the High and Low Bands Indicator by providing real-time data, powerful charting capabilities, and the flexibility needed to adapt the indicator to specific trading scenarios. For traders focused on precision and efficiency, incorporating High and Low Bands into their analysis using LightningChart JS Trader offers a reliable edge in the fast-paced world of financial markets.
Key Takeaways:
- High-Low Bands vs. Bollinger Bands: High-Low Bands are based on the triangular moving average, while Bollinger Bands rely on simple moving averages with a different calculation method.
- Technical Analysis: This indicator is valuable for tracking volatility, identifying trends, and setting dynamic support/resistance levels.
- LightningChart JS Trader provides an ideal platform for using High and Low Bands due to its real-time data processing and high customization options.

Ahmad Omid
Data Science Developer
Continue learning with LightningChart
Streaming Data Visualization with WebSockets (2026): The Complete Tutorial
Every WebSocket tutorial on the internet shows the same thing: a server sends a random number every second, a chart updates. It works. The demo looks great. Then you deploy to production, your IoT sensors push 800 updates per second across twelve channels, and the...

Best ScottPlot Alternative in 2026: GPU Rendering, 3D Charts, Cross-Language Support
ScottPlot is genuinely excellent for what it is: a free, MIT-licensed, actively developed .NET plotting library with an honest focus on interactive large-dataset display. The GDI+ rasterized renderer — which draws the entire chart as a pixel bitmap rather than...
Using Fibonacci Tools in Trading: A Practical Guide for Market Analysis
Using Fibonacci Tools in Trading: A Practical Guide for Market AnalysisTechnical traders rely on various tools to identify potential support, resistance, and price targets. Among the most widely used are Fibonacci tools, which are based on the mathematical sequence...


If you have any questions, feel free to contact us!
©LightningChart Ltd 2026. All rights reserved.