


Python GUI Application Tutorial with PyQt & LightningChart Python
Tutorial
Written by a Human
Dive into this Python GUI application tutorial and discover how to build stunning interfaces using PyQt and LightningChart Python step by step.
Roy Liu
Data Science Python Developer

Python GUI Application Tutorial of a Real-Time Audio Data Visualization
Developing a desktop application for real-time audio data visualization requires seamless integration of various libraries and frameworks. In this tutorial, we will go through the creation of a Python-based GUI application that leverages LightningChart Python for powerful visualizations and PyQt for a responsive user interface.
Purpose of the Project
The purpose of this project is to enable users to develop a desktop real-time audio data visualization app using GUI elements and LightningChart Python. This app is designed to process audio files, display their waveform and frequency spectrum, and provide interactivity such as play, pause, and stop.
You can find the original GitHub post.
Functionalities of the Application
The application includes the following functionalities:
- Audio file import and playback.
- Real-time waveform visualization.
- Frequency spectrum analysis.
- GUI controls for play, pause, stop, and volume adjustment.
- Customizable chart themes.
LightningChart Python
LightningChart Python is a high-performance data visualization library known for efficiently handling large datasets. LightningChart Python was instrumental in rendering multiple environmental parameters from NOAA’s API and simulating real-time data playback in this project.
Its flexibility allowed for the seamless integration of various chart types, such as line charts with stacked Y-axes, which visualized wind speeds, water levels, tide predictions, and temperature variations. LightningChart Python’s powerful rendering capabilities ensured smooth and responsive updates, even when processing multiple parameters in simulated real-time.
Why LightningChart Python?
LightningChart Python stands out for its:
- Real-time rendering capabilities.
- Support for multiple chart types (e.g., waveform, frequency spectrum).
- Easy customization and theming options.

Setting Up Python Environment
To set up the Python environment for this project, you need to install Python and the necessary libraries. This includes installing LightningChart Python, Numpy, PyQt5 and Pygame.
Here’s a quick setup guide:
- Install Python: Download and install the latest version of Python from the official website.
- Install Libraries: Use
pipto install the required libraries:
pip install lightningchart PyQt5 pygame numpy- Set up your development environment by creating a new project directory and installing the required libraries. Ensure that LightningChart Python is properly licensed and that required assets like icons are stored in appropriate directories.
Overview of Libraries Used
This project integrates several libraries to achieve its functionality:
- PyQt5: Provides the GUI framework for building a desktop application. (documentation)
- Pygame: Handles audio playback and manipulation. (documentation)
- Numpy: For numerical operations. (documentation)
- LightningChart Python: For creating high-performance, interactive data visualizations. (documentation)
UI and Core Features Development
Basic GUI Layout: The application uses PyQt5 for the GUI layout. Here is the code snippet for creating the main window and layout.
class App(QMainWindow):
    def __init__(self, url, update_waveform, update_frequency, reset_visualization, audio_thread=None):
        super(App, self).__init__()
        self.setWindowTitle("LightningChart Python Audio Visualizer")
        self.setGeometry(100, 100, 800, 600)

        central_widget = QWidget()
        self.setCentralWidget(central_widget)

        self.web_view = CustomWebEngineView()
        self.web_view.setUrl(QUrl(url))

        layout = QVBoxLayout()
        central_widget.setLayout(layout)
        layout.addWidget(self.web_view)
Loading Audio Files
The application provides a seamless experience for loading audio files. Users can either click the Load File button to choose their file from a specified directory or simply drag and drop the audio file directly into the application window. This functionality was implemented using PyQt’s drag-and-drop events (this feature eliminates unnecessary clicks, enhancing the user experience):
def dragEnterEvent(self, event):
    if event.mimeData().hasUrls():
        event.acceptProposedAction()
    else:
        event.ignore()

def dropEvent(self, event):
    urls = event.mimeData().urls()
    if urls:
        file_path = urls[0].toLocalFile()
        if file_path.lower().endswith(('.mp3', '.wav')):
            self.loaded_file_label.setText(f"Loaded File: {file_path}")
        else:
            self.loaded_file_label.setText("Error: Unsupported file type.")
Adding Buttons and Controls to the Application
User interaction is a crucial part of any application. In this project, we added essential controls to the app, such as buttons for loading files, starting or pausing playback, stopping playback, and adjusting the volume. These controls were implemented using PyQt5 widgets. Below is a snippet showing how the buttons and slider were created and added to the application layout:
# Create and add buttons
self.load_button = QPushButton("Load File")
self.load_button.setFixedWidth(100)

self.play_pause_button = QPushButton()  # Single Play/Pause button
self.play_pause_button.setFixedWidth(100)
self.stop_button = QPushButton("Stop")
self.stop_button.setFixedWidth(100)

# Set initial play icon
self.play_icon = QIcon("icons/play-button.png")
self.pause_icon = QIcon("icons/pause-button.png")
self.play_pause_button.setIcon(self.play_icon)

# Add volume slider
self.volume_slider = QSlider(Qt.Horizontal)
self.volume_slider.setRange(0, 100)
self.volume_slider.setValue(50)
self.volume_slider.setFixedWidth(150)
self.volume_slider.setToolTip("Adjust Volume")
These buttons were then added to a horizontal layout and integrated into the main interface. Each button is connected to a specific function to enable file loading, control playback, and adjust audio volume. Here’s how the buttons were organized in the layout:
# Add widgets to the layout
button_layout.addWidget(self.load_button)
button_layout.addWidget(self.play_pause_button)
button_layout.addWidget(self.stop_button)
button_layout.addWidget(self.volume_slider)

# Add the button layout to the main layout
layout.addLayout(button_layout)
Chart Integration
Here’s how the charts for waveform and frequency spectrum are initialized:
# Waveform chart setup
waveform_chart = dashboard.ChartXY(column_index=0, row_index=1)
waveform_chart.set_title("Audio Waveform")
waveform_series = waveform_chart.add_line_series(data_pattern='ProgressiveX')

# Frequency chart setup
frequency_chart = dashboard.ChartXY(column_index=0, row_index=0)
frequency_chart.set_title("Frequency Visualization")
frequency_series = frequency_chart.add_area_series(data_pattern='ProgressiveX')
Customizing the Frequency Chart with a Color Palette
To enhance the visualization of the frequency chart, a color palette was applied to represent different frequency ranges with corresponding colors. This makes the frequency spectrum more visually intuitive:
def apply_frequency_palette(series):
    palette_steps = [
        {"value": 20, "color": lc.Color(0, 255, 0, 128)},     # Green with 50% transparency
        {"value": 200, "color": lc.Color(255, 255, 0, 128)},  # Yellow with 50% transparency
        {"value": 1000, "color": lc.Color(255, 165, 0, 128)}, # Orange with 50% transparency
        {"value": 5000, "color": lc.Color(255, 0, 0, 128)},   # Red with 50% transparency
        {"value": 20000, "color": lc.Color(128, 0, 128, 128)} # Purple with 50% transparency
    ]

    series.set_palette_area_coloring(
        steps=palette_steps, look_up_property="x", interpolate=True, percentage_values=False
    )
This function is applied to the frequency_series
Customizing the LightningChart Python Theme
LightningChart Python offers customizable themes to adapt the application’s appearance to user preferences or branding requirements. At the end, we demonstrate both the LightDarkWhiteBlackTurquoiseHexagonCyberspace
dashboard = lc.Dashboard(columns=1, rows=2, theme=lc.Themes.Dark)End Result
Below is a glimpse at the final result showcasing the application in two different themes:


Conclusion
By combining LightningChart Python’s robust visualization tools with PyQt’s flexible GUI capabilities, this Python GUI application tutorial demonstrates how to create a dynamic audio visualization application. For those interested in exploring further or running the code, refer to the source code.
Continue learning with LightningChart
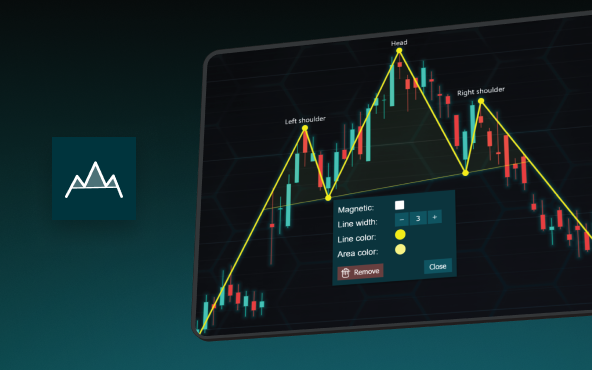
The Head and Shoulders Pattern in Technical Analysis
The Head and Shoulders Pattern in Technical Analysis The Head and Shoulders Pattern in Technical Analysis The Head and Shoulders pattern is one of the most recognized and widely used chart patterns in technical analysis. It is considered a reliable reversal pattern...
Best Telerik Charts Alternative in 2026: GPU Performance for WPF, WinForms, and Web
Telerik from Progress is a comprehensive UI component suite covering WPF, WinForms, ASP.NET, Blazor, and JavaScript. The charting components: RadChartView for WPF and WinForms, and Kendo UI Charts for web and Blazor, arrive bundled with the suite purchase. For teams...
Streaming Data Visualization with WebSockets (2026): The Complete Tutorial
Every WebSocket tutorial on the internet shows the same thing: a server sends a random number every second, a chart updates. It works. The demo looks great. Then you deploy to production, your IoT sensors push 800 updates per second across twelve channels, and the...


If you have any questions, feel free to contact us!
©LightningChart Ltd 2025. All rights reserved.