


Creating a JavaScript Distance Intensity Chart for Optical Fiber Analysis with LightningChart JS
Tutorial
Written by a Human
Create powerful visualizations with LightningChart JS to improve your understanding of optical fiber analysis.
Omar Urbano
Software Engineer

Introduction
This article is based on a real use case of LightningChart JS in optical fiber analysis. Optical fiber analysis involves evaluating the quality of the optical fiber using metrics such as attenuation to detect performance issues at a specific point in time or over a certain period.
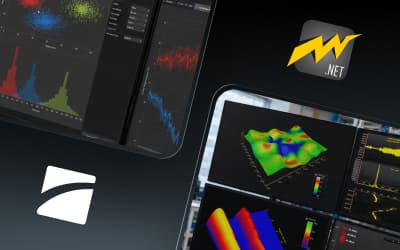
The demonstration features an interactive panel that allows fiber properties analysis over a short time interval (~30 seconds). Measurements are taken at multiple points distributed along more than 3 kilometers of fiber, enabling identification of areas with possible faults or losses. The main metric visualized is intensity, recorded by location (in meters) and by time step.
This intensity value is abstract and can represent different variables depending on the analysis focus, with attenuation being one of the most common. Each sample is represented on a heatmap-style grid using a color lookup table (LUT), which makes it easier to identify critical areas (for example, orange indicates an unfavorable condition, while blue represents normal conditions). The data used in this example is randomly generated each time the demonstration runs.
¿What is a Distance Intensity Chart?
A Distance Intensity Chart is a way to show how the intensity of a signal changes along a physical path or route. Suppose you have an optical fiber several kilometers long and want to see how the signal passing through it weakens or holds steady throughout its length. This chart lets you visualize that variation.
The horizontal axis of the chart represents distance, that is, the position in meters or kilometers along the fiber. The vertical axis shows the signal intensity measured at each point along that distance. This way, you can easily identify if the intensity drops significantly at any location, which could indicate a problem like a faulty connection or fiber damage.
Additionally, in some cases, colors are used to make the chart more intuitive, for example, warm tones for problematic areas and cool colors for areas that are fine. This helps quickly spot critical points. This type of chart is very useful for monitoring and maintaining systems like fiber optic networks because it allows you to see where possible faults or signal losses occur along the cable, so you can take action to fix them.
Project Overview
To follow this project, download the ZIP file with all the necessary resources.

 Optical Fiber Analysis
Template Setup
1. Download the template provided to follow the tutorial.
2. After downloading the template, you’ll see a file tree like this:

3. Open a new terminal and run the npm install command
4. It is important to keep the configuration in the tsconfig.json file. This configuration will help you to import JSON files as data objects.
Getting Started
We recommend you use and update to the most recent versions of LightningChart JS and XYData. This is because some LightningChart JS tools do not exist in previous versions. In the project’s package.json file you can find the LightningChart JS dependencies:
"dependencies": {
    "@lightningchart/lcjs": "^7.1.1",
    "@lightningchart/xydata": "^1.5.0"
}
1. Importing classes
We will start by importing the necessary classes to create our chart.
const lcjs = require('@lightningchart/lcjs')
const xydata = require('@lightningchart/xydata')
const {
    lightningChart,
    AxisTickStrategies,
    emptyLine,
    emptyFill,
    AreaSeriesTypes,
    ColorRGBA,
    regularColorSteps,
    PalettedFill,
    LUT,
    emptyTick,
    UIElementBuilders,
    UIOrigins,
    Themes,
} = lcjs
2. Add license key (free)
Once the LightningChart JS libraries are installed, we will import them into our chart.ts file. Note you will need a trial license, which is free.
let license = undefined
try {
    license = 'xxxxxxxxxxxxx'
} catch (e) {}Chart.ts
This code visualizes simulated optical fiber signal intensities over distance and time, combining a heatmap and area chart for detailed analysis.
Configuration Setup
The CONFIG object defines parameters for two axes. Distance (X-axis) which ranges from 0 to 3200 meters, sampled every 10 meters; and, Time (Y-axis), which ranges over a 34-second interval in milliseconds, sampled every second. These values shape how the data will be generated and displayed.
const CONFIG = {
    /**
     * Step between optical fibre measurements (Meters).
     */
    opticalFibreDistanceStep: 10,
    /**
     * Start value for optical fibre axis (Meters).
     */
    opticalFibreDistanceStart: 0,
    /**
     * End value for optical fibre axis (Meters).
     */
    opticalFibreDistanceEnd: 3200,
    /**
     * Step between each heat map row along Time Axis (lower chart Y axis) (Milliseconds).
     */
    timeStep: 1000,
    /**
     * Start time along Time Axis (lower chart Y axis) (Milliseconds).
     */
    timeStart: new Date('2021-06-17T08:54:04').getTime(),
    /**
     * End time along Time Axis (lower chart Y axis) (Milliseconds).
     */
    timeEnd: new Date('2021-06-17T08:54:38').getTime(),
}
Data Generation (Simulated)
The call dataPromise asynchronously generates synthetic heatmap data. It calculates how many time steps and distance points are needed. For each step, it generates a trace (a list of values) using createProgressiveTraceGenerator(), transforms it, and collects all traces into traceDataArray. It also creates an areaData array that sums intensities at each distance point over time, used for a line/area chart.
const dataPromise = new Promise(async (resolve) => {
    const timeStepsCount = Math.ceil((CONFIG.timeEnd - CONFIG.timeStart) / CONFIG.timeStep)
    const opticalFibreLengthX = Math.ceil(
        (CONFIG.opticalFibreDistanceEnd - CONFIG.opticalFibreDistanceStart) / CONFIG.opticalFibreDistanceStep,
    )
    const traceDataArray = await Promise.all(
        new Array(timeStepsCount).fill(0).map((_, i) =>
            createProgressiveTraceGenerator()
                .setNumberOfPoints(opticalFibreLengthX)
                .generate()
                .toPromise()
                .then((xyPoints) => xyPoints.map((xy) => Math.abs(xy.y * 100))),
        ),
    )
    // `traceDataArray` can be supplied into heat map series as is,
    // calculate data for Area Series by summing every trace column value for every X coordinate.
    const areaData = new Array(opticalFibreLengthX).fill(0).map((_, iX) => ({
        x: CONFIG.opticalFibreDistanceStart + iX * CONFIG.opticalFibreDistanceStep,
        y: traceDataArray.reduce((sum, cur) => sum + cur[iX], 0),
    }))

    resolve({
        traceDataArray,
        areaData,
    })
})
Chart Setup
A new ChartXY is created using LightningChart, with a dark theme and custom layout.
const chart = lightningChart({license:license})
    .ChartXY({
        theme: Themes.darkGold,
    })
    .setTitle('Distance Intensity Chart')
The default Y-axis is removed.
chart.yAxis.dispose()A top Y-axis is added to show the intensity sum (area chart).
const axisTopY = chart
    .addAxisY({ iStack: 1 })
    .setTitle('Intensity Sum')
    .setLength({ pixels: 200 })
    .setMargins(10, 0)
    .setUserInteractions({
        wheel: { mode: 'keep-start' },
        touchZoom: { mode: 'keep-start' },
    })
A bottom Y-axis displays time using DateTime formatting, offset by dateOrigin to handle zooming correctly.
const axisBottomY = chart
    .addAxisY({ iStack: 0 })
    .setTitle('Time')
    .setTickStrategy(AxisTickStrategies.DateTime, (ticks) => ticks.setDateOrigin(new Date(dateOrigin)).setGreatTickStyle(emptyTick))
The X-axis shows fiber distance.
const axisX = chart.axisX.setTitle('Optical Fiber Distance (m)')Color Mapping and LUT
A Lookup Table (LUT) defines how intensity values are translated into colors on the heatmap. It uses a palette and disables interpolation for a stepped, clear-color look.
const lut = new LUT({
    interpolate: false,
    steps: [{ value: 0, color: ColorRGBA(0, 0, 0, 0) }, ...regularColorSteps(200, 600, theme.examples.intensityColorPalette)],
})
Visualizing Optical Fiber Analysis Data
Once the promise is resolved. For example, an area chart is rendered on the top Y-axis using areaData, showing summed intensity per distance point.
dataPromise.then((data: { traceDataArray: any[]; areaData: any[] }) => {
    const { traceDataArray, areaData } = data
    chart.setCursorMode('show-all-interpolated').setCursorFormatting((_, __, hits) => {
        const hitIntensity = hits.find((hit) => hit.series === areaSeries)
        const hitHeatmap = hits.find((hit) => hit.series === heatmapSeries)
        if (!hitIntensity || !hitHeatmap) return
        return [
            [
                {
                    text: `Optical fiber distance: ${Math.round(hitIntensity.x)} m`,
                    rowFillStyle: chart.getTheme().cursorResultTableHeaderBackgroundFillStyle,
                },
            ],
            [hitIntensity.series, '', hitIntensity.axisY.formatValue(hitIntensity.y)],
            [hitHeatmap.series, ''],
            ['', hitHeatmap.axisY.formatValue(hitHeatmap.y)],
            ['Intensity', '', hitHeatmap.intensity.toFixed(1)],
        ]
    })
Another example is the heatmap rendered below using traceDataArray, showing how intensity varies across distance and time. The chart’s cursor is customized to show detailed tooltips from both series (area and heatmap).
const heatmapSeries = chart
        .addHeatmapGridSeries(heatmapOptions)
        .setStart({
            x: CONFIG.opticalFibreDistanceStart,
            y: CONFIG.timeStart - dateOrigin,
        })
        .setStep({
            x: CONFIG.opticalFibreDistanceStep,
            y: CONFIG.timeStep,
        })
        .setIntensityInterpolation('disabled')
        .invalidateIntensityValues(traceDataArray)
        .setFillStyle(
            new PalettedFill({
                lookUpProperty: 'value',
                lut,
            }),
        )
        .setWireframeStyle(emptyLine)
UI Enhancements
A color legend (LUTRange) is added to explain intensity levels visually. It’s styled with a transparent background and placed at the bottom center of the chart for better readability.
const lutRange = chart
        .addUIElement(UIElementBuilders.LUTRange)
        .setLUT(lut)
        .setLUTLength(500)
        .setLookUpUnit('Intensity')
        .setPosition({ x: 50, y: 0 })
        .setOrigin(UIOrigins.CenterBottom)
        .setAutoDispose({
            type: 'max-width',
            maxWidth: 0.8,
        })
        .setBackground((background) => background.setFillStyle(emptyFill).setStrokeStyle(emptyLine))
npm start
In the terminal, write the command npm start to visualize the chart in your local server; enter, and you’ll see a response with http://localhost:8080/, where the chart will be stored and ready to be visualized.
Conclusion
Thank you for making it this far. This solution offers a high-performance and easy-to-implement solution for visualizing fiber optic signal data. It uses asynchronous data generation with Promise.all() and configurable configuration to efficiently simulate time-based measurements.
LightningChart’s optimized ChartXY engine ensures smooth rendering of large data sets, with heatmap interpolation disabled to improve performance and visual clarity. The centralized configuration object simplifies customization of time and distance parameters, making the code highly adaptable.
Visually, the chart combines a heatmap for detailed time-varying data and an area chart for aggregated intensity trends, providing a comprehensive view with a clean design. Interactive features, such as custom tooltips and a LUT-based color legend, improve usability without complicating the code. Overall, the modular structure, intuitive design, and high responsiveness make LightningChart JS a solid foundation for both experimental and production optical monitoring applications. Thank you.
Continue learning with LightningChart
Best DevExpress Charts Alternative in 2026: GPU Performance for Web and Desktop
DevExpress is one of the most comprehensive UI component suites in the .NET and web ecosystem. WinForms, WPF, ASP.NET, Blazor, JavaScript it covers the full Microsoft-aligned development stack with grids, schedulers, form components, reporting, and charting all...
Best Chart.js Alternatives in 2026: When You’ve Outgrown the Basics
Chart.js is the correct answer for a lot of chart projects. MIT license with no commercial restrictions, ~14KB gzipped, documentation that is genuinely among the best in the ecosystem, 65,000+ GitHub stars, and the largest community of any JavaScript chart library by...
Best AnyChart Alternatives in 2026: GPU Performance, Transparent Pricing, Free Trials
AnyChart is a commercially-oriented JavaScript charting library that markets itself on enterprise reliability, used by over 75% of Fortune 500 companies per their own claims, with a broad catalog of 70+ chart types covering Gantt, maps, stock charts, and more. The...


If you have any questions, feel free to contact us!
©LightningChart Ltd 2025. All rights reserved.