Zooming, panning and rotating
ZoomPanOptions properties can be used to control the zooming, panning and rotation settings.
Depending on the settings, zooming can be performed with mouse wheel, by touch screen pinching/spreading, or by painting a box on selected 3D plane. Panning, box zooming, and rotating can all be performed by left, middle or right mouse button, as they are configurable. Panning can be made for the whole 3D chart, or so that primary axes are adjusted while keeping the 3D scene location the same.
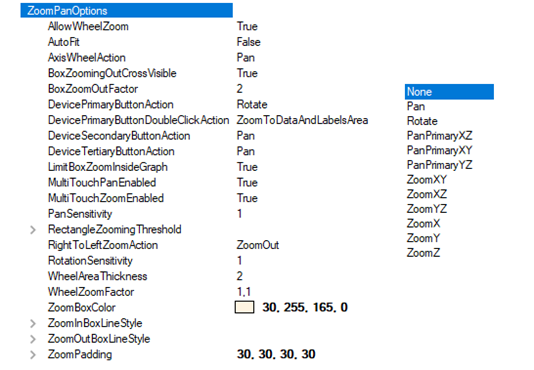
ZoomPanOptions properties and sub-properties, with DevicePrimaryButton / DeviceTertiaryButtonAction / DeviceSecondaryButtonAction options on the right.
Mouse wheel zooming
Scroll mouse wheel up to zoom in, and down to zoom out. Use WheelZoomFactor to adjust the amount of applied zoom with every mouse wheel event. To disable mouse wheel zooming, set AllowWheelZoom to false. By default, this is set true.
Box zooming
To enable box zooming, assign the box zooming to a mouse button action property. For example, DevicePrimaryButtonAction = ZoomXZ causes the box zoom to apply to XZ plane. Y dimension is not affected. Set ZoomXZ or ZoomYZ respectively for zooming other planes.
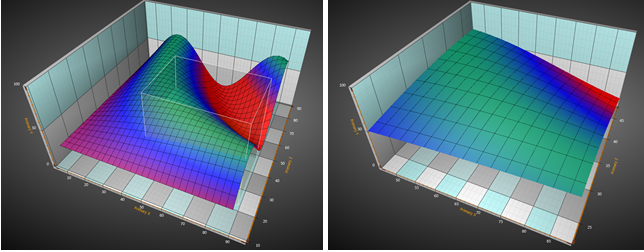
On the left, XZ-plane box zooming in progress. On the right, the outcome of the zooming. X and Z axis ranges are modified while Y axis range stays the same.
Zoom in by dragging box from left to right. The zoomed ranges are applied to axes related to the selected plane. To zoom only specific dimension, X, Y or Z, select ZoomX, ZoomY or ZoomZ.
Zoom out by dragging box from the right to left. Zooming out is applied by factor set in BoxZoomOutFactor. Zooming out shows a cross in the front of the box. It can be disabled by setting BoxZoomingOutCrossVisible = False.
ZoomPadding
ZoomPadding property defines the amount of empty space left between the 3D model and the margins after a zooming operation. ZoomPadding has no effect when moving the chart or zooming manually, for example by mouse scrolling. Furthermore, ZoomPadding does not apply to rectangle-based zooming.
Setting ZoomPadding in WinForms:
chart.View3D.ZoomPanOptions.ZoomPadding = new Padding(10, 30, 10, 10);
Setting ZoomPadding in Wpf:
chart.View3D.ZoomPanOptions.ZoomPadding = new Thickness(10, 30, 10, 10);
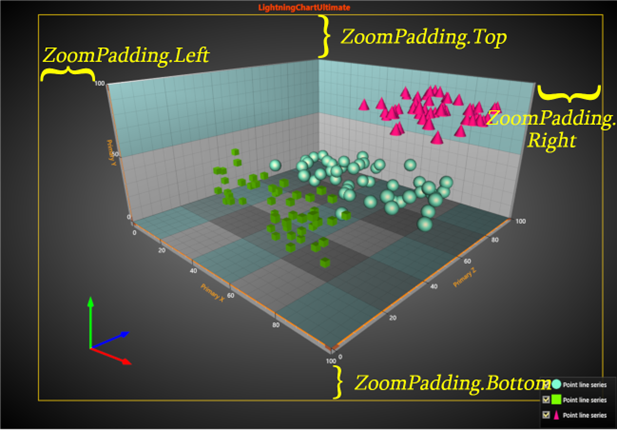
ZoomPadding leaves empty space between data/labels and the margins if for example ZoomToDataAndLabels operation is used as in this case.
ZoomToDataAndLabels
In View3D, ZoomToDataAndLabels operation causes the available area, limited by margins and ZoomPadding, to be used as optimally as possible by moving the camera closer/farther. Axes, labels, series data and markers are all kept visible. Chart title, annotations and legend boxes are ignored as their position is defined in screen coordinates. ZoomToDataAndLabels maintains the viewing angle while the contents of the view are centered.
By default, DevicePrimaryButtonDoubleClickAction property is set as ZoomToDataAndLabels, meaning double-clicking the mouse left button activates the operation. Disable this by changing the property to Off. In code, ZoomToDataAndLabels can be invoked by View3D.ZoomToFit(ZoomArea3D.DataAndLabelsArea) method.

ZoomToDataAndLabels operation has been activated. Data series, axes, walls etc. have been optimally fitted within the margins. Orientation arrows follow the bottom-left corner of the graph area but legend boxes are ignored. ZoomPadding = 0 for all edges, thus no empty space is left between the margins and the DataAndLabelsArea.
Note that ZoomToDataAndLabels takes MinimumViewDistance property of the camera to account, meaning that in some cases the full available graph area might not be used as the camera can’t get close enough to the chart. A ChartMessage notification is sent in this case.
Rotating and panning
View3D. Camera can be rotated around the 3D model by pressing the assigned mouse button down and by dragging horizontally or vertically. Camera. RotationX, RotationY and RotationZ properties are updated.
When (ZoomPanOptions) a mouse button action is set to Pan, panning updates Target property of Camera. When mouse button action is set to PanPrimaryXZ, PanPrimaryXY or PanPrimaryYZ, the primary X, Y and Z axes ranges are adjusted. For example, PanPrimaryXZ adjusts X and Z axes when dragging with mouse. Secondary X, Y and Z axes are not altered.
Set DevicePrimaryButtonAction / DeviceTertiaryButtonAction / DeviceSecondaryButtonAction to Pan/PanPrimaryXZ/PanPrimaryXY/PanPrimaryZ to enable panning. Set it to Rotate to enable rotating. To disable panning and rotating from mouse button, set it to None.
Use PanSensitivity to control the amount of applied panning. Respectively, use RotationSensitivity to control the amount of applied rotation.
Zooming with touch screen
Set two fingers on the chart, and pinch them closer to zoom out, or away to zoom in. To disable zooming with touch screen, set MultiTouchZoomEnabled to False.
Panning with touch screen
Set two fingers on the chart and move them to the same direction to apply panning. To disable panning with touch screen, set MultiTouchPanEnabled to False.
Using mouse wheel over an axis
When mouse wheel is scrolled over an axis, the chart makes axis-specific zooming or panning. WheelAreaThickness adjusts how wide the mouse wheel sensitive area is near the axis. AxisWheelAction can be used to select between zooming and panning.
Zooming, rotating and panning by code
3D view is rotated by moving the View3D.Camera with RotationX, RotationY and RotationZ properties. With Perspective and Orthographic camera, zoom can be done by setting ViewDistance. With OrthographicLegacy camera, the Dimensions are changed to achieve zooming. Panning is done by setting camera Target as 3D model coordinates.