TradingChart
Trader libraries (LightningChart.WPF.Trading.NET4.dll / LightningChart.WinForms.Trading.NET4.dll) consist of controls, tools and methods for creating trading and finance applications easily. The Trader library is built over robust and fast LightningChart API.
TradingChart is currently the main control. TradingChart comes with a compact interface of properties and methods to build trading applications, without the API overhead that comes from complex engineering applications. Current version includes WPF and WinForms Forms charts.
This document illustrates the basic usage of LightningChart® TradingChart as well as most of its available properties and settings. There are also several TradingChart based examples in Interactive Examples application. It is recommended to check those as well to get better understanding of building trading applications with TradingChart.
Basic usage
Creating TradingChart
In order to use TradingChart, corresponding assemblies should be added to the project. First, add LightningChart. WPF / WinForms .Trading.NET4.dll to the References of the project. Reference to the regular LightningChart control (LightningChart. WPF / WinForms .Charting.NET4.dll) should also be added to ensure all the chart’s features work properly. Next import all the types from Trader namespace with
using LightningChartLib.WPF.Trader;
// OR
using LightningChartLib.WinForms.Trader;
Now it is possible to create TradingChart -objects.
// Creating a TradingChart component
TradingChart _chart = new TradingChart();

// WPF. Adding chart into the parent container, in this case a grid.
(Content as Grid).Children.Add(_chart);

// WinForms. Adding chart into the parent container, in this case a Form.
_chart.Parent = this;
_chart.Dock = DockStyle.Fill;
It is also possible to create a TradingChart component by dragging it from Visual Studio’s toolbox. If successfully created, TradingChart should look like the following.
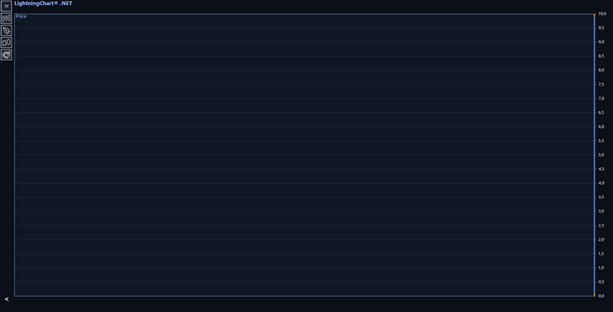 A TradingChart has been created and added to a container.
Deploying TradingChart
To be able to run TradingChart applications in computers the software is deployed into, a Deployment Key has to be applied in code. This is done similarly to regular LightningChart (see Deployment). Reference to the internal charting component has to be added to the project: LightningChartLib.WPF.Charting.LightningChart / LightningChartLib.WinForms.Charting.LightningChart.
Configuring user interface
TradingChart has several properties to control the appearance of the user interface.
Setting color-theme
TradingChart has several pre-defined color-themes to choose from. SetAppearance() -method can be used to change the theme.
// Setting a color-theme.
_chart.SetAppearance(Appearance.Dark);
Color-theme can also be changed via the color menu located in the toolbar on the left of the chart.
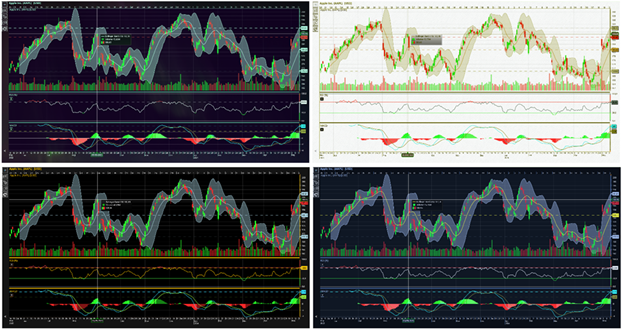 Some of the pre-defined color-themes
Note that changing color-theme overrides manually set colors for indicators and drawing tools. Therefore, individual colors should be modified only after setting the color-theme.
Setting price chart type
TradingChart has several price chart types available: Candlesticks, Bars, Line and Mountain. Chart type button in the toolbar can be used to switch between the types during runtime. PriceChartType -property can be used to change the chart type in code.
// Show trading data as a mountain.
_chart.PriceChartType = PriceChartType.Mountain;
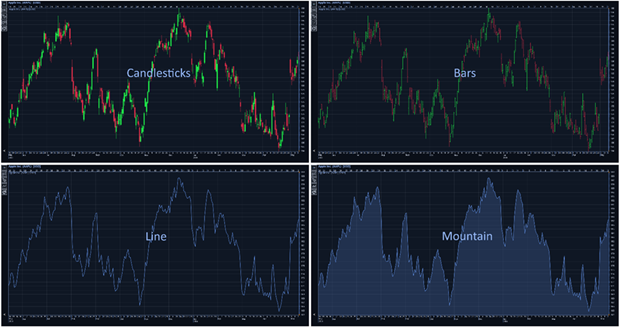 Available price chart types: Candlesticks, Bars, Line and Mountain.
UI components
TradingChart’s user interface consists of two main parts: the chart itself and the toolbar located on the left of the chart. The latter can be shown and hidden by pressing the arrow button on the bottom-left corner of the chart. Also, when adding study indicators (indicators appearing below the price chart), additional button appears in the indicator’s segment, allowing user’s to remove the indicator if needed.
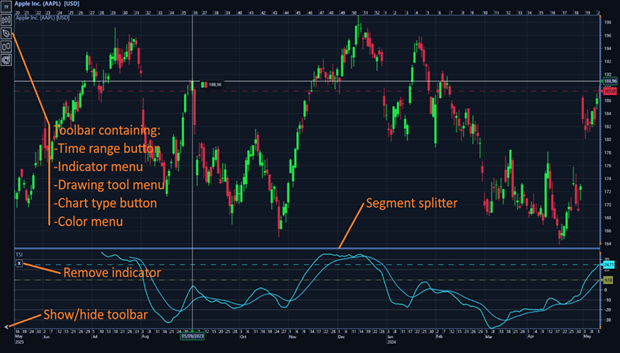 TradingChart’s main user interface components.
Time range button in the toolbar opens a selection of pre-defined time ranges, allowing users to change the shown time range while the application is running.
Indicator and drawing tool menus open a list of available indicators and drawing tools respectively. Clicking an indicator on the list adds it to the chart, while clicking on a drawing tool initiates drawing. See drawing tools chapter for further information.
The remaining two buttons on the toolbar are chart type button for changing the current chart type and color menu for changing the color-theme. Check previous chapters for further details.
The toolbar can also be hidden in code by disabling ShowToolbar property.
// Hiding the toolbar.
_chart.ShowToolbar = false;
Some technical indicators such as MACD and RelativeStrengthIndex are drawn in a separate segment below the chart. In these cases, a horizontal line called Segment splitter is automatically drawn between the segments. Dragging this line by mouse allows modifying the heights of the segments. Segment splitters can be hidden by disabling ShowSegmentSplitters -property. This also prevents modifying the segment heights by mouse dragging.
// Hide the vertical lines drawn between segments.
_chart.ShowSegmentSplitters = false;
Using internal LightningChart control
TradingChart is built on top of a regular LightningChart control. GetInternalChart() -method allows direct access to this internal chart instance and all of its properties. It is therefore possible to have a combination of features from both charts. To access the internal chart a reference to respective assembly must be included in the project (i.e. LightningChart.WPF.Charting.NET4).
// Changing properties of the internal chart
LightningChart chart = _tradingChart.GetInternalChart();
chart.ViewXY.GraphBackground.Color = Colors.Black;

// Alternatively
_tradingChart.GetInternalChart().ViewXY.GraphBackground.Color = Colors.Black;

// Adding a regular Annotation to a TradingChart
LightningChart chart = _tradingChart.GetInternalChart();
AnnotationXY anno = new AnnotationXY(chart.ViewXY, chart.ViewXY.XAxes[0], chart.ViewXY.YAxes[0]);
chart.ViewXY.Annotations.Add(anno);
It should be noted that changing properties of TradingChart may override settings done directly to the internal chart control. For example, modifying the appearance of TradingChart overrides the above GraphBackground color setting. Furthermore, actions such as adding various series to their respective collections should be done with caution as the same collections are also used by the TradingChart series.
// Example of a conflicting situation.
LightningChart chart = _tradingChart.GetInternalChart();
StockSeries stockSeries = new StockSeries(chart.ViewXY, chart.ViewXY.XAxes[0], chart.ViewXY.YAxes[0]);
chart.ViewXY.StockSeries.Add(stockSeries);

chart.ViewXY.StockSeries[0].Visible = false;
The above example does not change the visibility of the newly added StockSeries, instead the OHLC-data loaded to TradingChart will be hidden as the same StockSeries collection is used by the TradingChart and its internal chart. The loaded OHLC-data is rendered using a StockSeries which reserves the first index of that collection.
Adding trading data
Trading data can be added to TradingChart by setting data in code via SetData() and AddData() methods, or by reading from a csv-file. In the former case, the trading data can be from any source as long as it can be presented in OHLC-format. The data source is up to the user to define, as LightningChart does not offer any built-in data providers.
Adding data in code
TradingChart has several methods to add, update and remove trading chart.
SetData method sets an array of new data points to the chart, replacing the old data. The array entries are of OhlcData type, each consisting of Open, High, Low, Close and DateTime fields, as well as optional Volume and OpenInterest fields. The method also allows setting currency and title for the dataset.
// Using SetData to set new dataset to the chart.
OhlcData[] data = new OhlcData[]
{
    new OhlcData() { Open = 10, High = 12, Low = 9, Close = 11, DateTime =  new    DateTime(2025, 10, 20), Volume = 150 },
    new OhlcData() { Open = 11, High = 13, Low = 10, Close = 10, DateTime =  new DateTime(2025, 10, 21), Volume = 200 },
    new OhlcData() { Open = 9, High = 12, Low = 8, Close = 10, DateTime =  new DateTime(2025, 10, 22), Volume = 250 }
};
_chart.SetData(data, "USD", "StockName");
AddData method adds one or more data points to the end of the existing data. It works similarly to SetData, but has one more optional parameter: zoomToFit which when enabled, automatically zooms the chart to fit all data on screen after the new data has been added. This setting is enabled by default.
// Using AddData to add one data point at the end of existing data.
_chart.AddData(new OhlcData[] { new OhlcData() { Open = 14, High = 16, Low = 10, Close = 13, DateTime = new DateTime(2025, 10, 23), Volume = 350 } }, "USD", "StockName", true);
UpdateLastDataPoint updates the last (newest) data point of the current set displayed in the chart. Even though the method takes DateTime value as part of OhlcData struct, it does not update the time stamp of the point, only OHLC-values and optional Volume and Open Interest values are affected.
// Updating the last data point. Given DateTime value has no effect.
_chart.UpdateLastDataPoint(new OhlcData() { Open = 13, High = 16, Low = 11, Close = 14, DateTime = new DateTime(2025, 10, 23), Volume = 340 });
ClearData removes all trading data from the chart. It also takes two parameters, clearIndicators and clearDrawingTools, which allow removing all added technical indicators and drawing tools if necessary.
// Removing all data. Added indicator are kept while drawing tools are removed.
_chart.ClearData(false, true);
Reading data from file
TradingChart can read trading data directly from a .csv -file via GetOhlcDataFromFile() -method. It takes file name (and path) as a parameter and returns an array of OHLC -data.
// Read trading data from a file
OhlcData[] dataFromFile = _chart.GetOhlcDataFromFile("fileName.csv");
GetOhlcDataFromFile() -method assumes that the data in the file is in the following column order: DateTime, Open, Close, High, Low, Volume (Optional), OpenInterest (Optional). DateTime field doesn’t have to contain hours, minutes and seconds. Currently, accepted date formats are “yyyy-mm-dd”, “yy-mm-dd” and “dd-mm-yyyy”. Accepted separators include dash (-) and backslash (/).
After the data has been read, use SetData() -method to add the data to the chart:
// Set data to the chart
_chart.SetData(dataFromFile, "Symbol", "Data set title");
Loading data from a file automatically adjusts the time range of the chart based on the first and the last DateTime values of the data set.
Adjusting time range
The time range of the chart can be adjusted via the toolbar on the left of the chart. The top button in the toolbar shows the current selected time range. Clicking it opens a time range selection menu, showing all available time range options. Clicking one of these options automatically modifies the trading data based on the selected time value.
If the selected time range is longer that the length of available data, time range will be adjusted based on the data. For instance, if three years is selected but there is only one year of data available, time range of one year will be shown. Furthermore, the selected time range is always based on the latest time value of the loaded data set. For example, if the latest date of the data is 31.08.2025, selecting one-year time range shows data between 01.09.2025 – 31.08.2025.
TradingChart also allows setting the time range in code. SetTimeRange() -method takes startTime and endTime parameters, that define the desired time range. The method also takes optional third parameter, dropDataOutsideRange, which when enabled (default option) drops all data outside the given range.
// Adjust time range to show the first half of the year 2025. Drop other data.
_chart.SetTimeRange(new DateTime(2025, 1, 1), new DateTime(2025, 6, 30), true);
Note that pressing the time range buttons in the toolbar, or loading data from a file, overrides the time range set by SetTimeRange().
Data cursor
TradingChart has a built-in data cursor which automatically tracks the visible trading data and technical indicators and shows their current values in a legend box. The cursor tracks data and indicators that are in the segment the cursor is currently over on. For instance, if a Relative Strength Index indicator has been added to the chart, its values will not be tracked as they are shown in a separate segment below the chart, unless the cursor is moved over that segment.Data cursor does not track drawing tools.
Data cursor tracks the Close values of the OHLC-data by default. This can be changed via OhlcField property.
// Set cursor to track High values.
_chart.DataCursor.OhlcField = PriceChartOhlcField.High;
By default, all data and every indicator will be tracked. It is however possible to control which series should be tracked. TrackOhlcData -property can be disabled to prevent the cursor from tracking the OHLC data.
// Data cursor doesn’t track the OHLC data loaded to chart.
_chart.TrackOhlcData = false;
Disabling TrackOhlcData affects only the OHLC data, indicators will still be tracked. To prevent cursor from tracking specific indicators, their TrackIndicator property can be disabled.
// Stops tracking this indicator
simpleMovingAverage.TrackIndicator = false;
TrackIndicator is available for indicators which are drawn in the same segment as OHLC data. In other words, segment indicators such as MACD and Relative Strength Index are always tracked if mouse is moved over the segments they belong to.
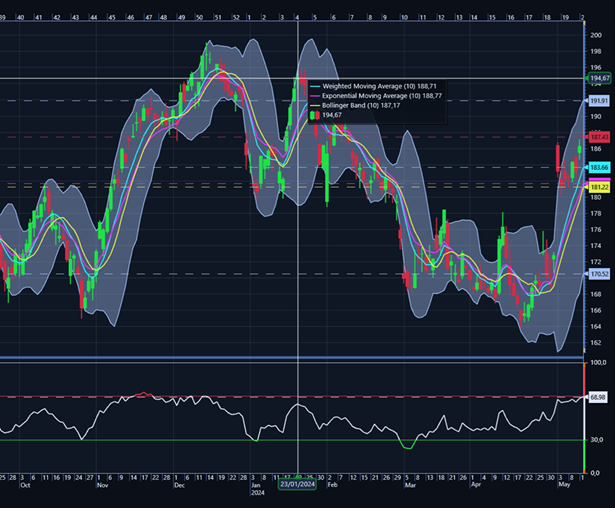 Data cursor tracking trading data and every added indicator. The price values are shown in the legend box next to the cursor. Relative Strength Index is not tracked since it is shown in a separate segment.
Data packing
TradingChart has DataPacking property which when enabled, causes data values close to each other be packed to a single rendered item. This improves performance, especially with larger data sets, but the data might not be as accurate as without packing.
// Enabling data packing.
_chart.DataPacking = true;
Technical indicators
TradingChart has several built-in Technical Indicators, which are automatically calculated based on the loaded trading data. Some indicators also have certain user-defined property settings affecting the calculations, for example, time period count for determining the number of time periods the indicator is based on.
Adding indicators
TradingChart has an Indicators list which is used to store all technical indicators. To add any technical indicator to the chart, first create and configure the indicator, then add it to Indicators -list.
For example, adding a RelativeStrengthIndex:
RelativeStrengthIndex rsi = new RelativeStrengthIndex()
{
    LineWidth = 1f,
    PeriodCount = 14,
    HighColor = Colors.Lime,
    LowColor = Colors.Red
};
_chart.Indicators.Add(rsi);
All available indicators can also be added via the indicator menu found in the toolbar. Clicking an indicator in the menu adds it to the chart as well as to the Indicators -list. The indicators added this way always use their default settings for properties such as PeriodCount.
Removing indicators
Removing technical indicators can be done by removing them from TradingChart’s Indicators list. The indicator is automatically disposed after removing it from the list.
_chart.Indicators.Remove(indicator);
Removing all indicators of same type:
List<Indicator> itemsToRemove = new List<Indicator>();
foreach (Indicator ind in _chart.Indicators)
{
    if (ind is RelativeStrengthIndex)
        itemsToRemove.Add(ind);
}
foreach (Indicator i in itemsToRemove)
    _chart.Indicators.Remove(i);
Indicators can also be removed via the user interface. Overlay indicators (drawn on top of the price data) can be removed by right-clicking them and selecting “Yes” from the confirmation window that appears. Study indicators (indicators appearing in their own segments) can be removed by pressing Remove button located near the top-left corner of the indicator’s segment.
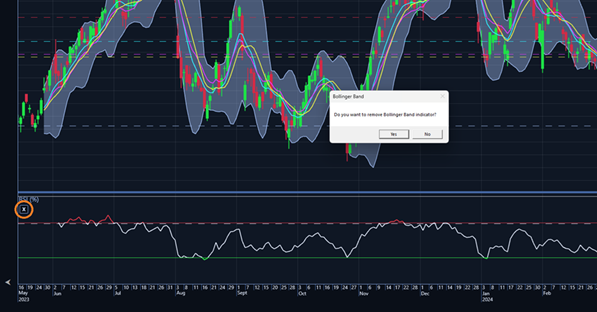 Bollinger Band has been right-clicked. Remove indicator button is also marked in the image.
Indicator types and properties
Technical indicators are either drawn on top of the trading data in the main segment (overlay), or in a separate segment below the chart (study) in which case the segment is automatically created when the indicator is added.
Indicators have several properties that can be used to modify their appearance or the calculations they are based on. These properties can be modified when the indicator is created or any time after its creation.
// Modifying indicator properties after its creation.
rsi.PeriodCount = 10;
rsi.LineColor = Colors.Blue;
rsi.LineWidth = 2;
Common indicator properties:
- PeriodCount Set the number of time periods used to calculate indicator values. Default value depends on the indicator.
- LineWidth Set the width of the indicator line where applicable. If the indicator composes of several lines, the property affects them all.
- Color Set the color of the indicator line where applicable. If the indicator composes of several lines, there is a separate Color-property for each line.
- TrackIndicator When enabled, data cursor will track this indicator and show its current value in the legend box. Only applicable to indicator shown on top of the trading data. Indicators in separate segments are always tracked.
- LimitYToStackSegment If enabled, the indicator is clipped outside its segment.
Some technical indicators also have properties that are specific to that indicator, for instance NumberOfStandardDeviations for Bollinger Band. These properties are set similarly to the common properties.
List of available indicators (and their abbreviations)
Envelopes
- Bollinger Band
- Donchian Channels
- Fractal Chaos Bands
- High Low Bands
- Keltner Channels
- Moving Average Envelopes (MAE)
- Prime Number Bands
- Standard Error Bands
- Stoller Average Range Channel
Moving Averages
- Exponential Moving Average (EMA)
- Simple Moving Average (SMA)
- Triangular Moving Average (TMA)
- Time Series Moving Average (TSMA)
- Variable Index Dynamic Average (VIDYA)
- Variable Moving Average (VMA)
- Volume Weighted Moving Average (VWMA)
- Weighted Moving Average (WMA)
- Welles Wilder’s Smoothing Average (WWS)
Oscillators – Money Flow
- Accumulation/Distribution (A/D)
- Chaikin Money Flow
- Chaikin Oscillator
- Ease of Movement
- Elder’s Force Index
- Klinger Volume Oscillator (KVO)
- Market Facilitation Index
- Money Flow Index
- Negative Volume Index
- On-Balance Volume (OBV)
- Positive Volume Index
- Price Volume Trend
- Trade Volume Index
- Twiggs Money Flow
- Volume
- Volume Oscillator
- Volume Rate of Change (Volume ROC)
- Williams Accumulation Distribution (Williams AD)
- Williams Variable Accumulation Distribution (WVAD)
Oscillators – Price
- Aroon Oscillator
- Awesome Oscillator
- Balance of Power
- Commodity Channel Index (CCI)
- Center of Gravity
- Chande Forecast Oscillator (CFO)
- Chande Momentum Oscillator (CMO)
- Coppock Curve
- Detrended Price Oscillator
- Elder-Ray Index
- Elder Thermometer (custom version)
- Fractal Chaos Oscillator (FCO)
- Intraday Momentum Index (IMI)
- Moving Average Convergence Divergence (MACD)
- Moving Average Convergence Divergence Custom (MACD Custom)
- Momentum Oscillator
- Percentage Price Oscillator (PPO)
- Performance Index
- Pretty Good Oscillator
- Prime Number Oscillator (PNO)
- QStick
- Rainbow Oscillator
- Rate of Change (ROC)
- Relative Strength Index (RSI)
- Stochastic Momentum Index (SMI)
- Stochastic Oscillator
- Stochastic Oscillator Smoothed
- True Strength Index (TSI)
- Ultimate Oscillator
- Ultimate Oscillator Smoothed (UO ST)
- Williams Percent Range (Williams %R)
Statistics
- Correlation Coefficient
- Kurtosis
- Median Price
- Skewness
- Standard Deviation
- Standard Error
- Typical Price
- Weighted Close
Trend Indicators
- Accumulative Swing Index (ASI)
- Average Directional Index (ADX)
- Aroon
- Gopalakrishnan Range Index (GAPO)
- Ichimoku Cloud
- Linear Regression
- Parabolic Stop-and-Reverse (PSAR)
- Random Walk Index
- Range Action Verification Index (RAVI)
- Schaff Trend Cycle (STC)
- Schaff Trend Cycle Signal (STC Signal)
- System Quality Number Trend (SQN Trend)
- Supertrend
- Swing Index
- Triple Exponential Average (TRIX)
- Vertical Horizontal Filter (VHF)
Volatility
- Average True Range (ATR)
- Chaikin Volatility
- Ehler Fisher Transform
- High Minus Low
- Historical Volatility
- Mass Index
- Z-Value
Other Indicators
- Open Interest
Custom indicators
TradingChart allows users to create their own custom indicators. There are three custom indicator types to choose from.
Custom Overlay
Custom Overlay allows adding a single line to top of the price data. It can be configured using the same LineWidth, LineColor etc. properties as other similar indicators. However, Custom Overlay has two major differences. First, its values are not automatically calculated based on the trading data. Instead, AddDataValues() method should be used to assign values to the indicator. The method accepts an array of double values. Second, Custom Overlay has Offset property, which can be used to set horizontal offset to the indicator. This can be used to place the indicator in a correct position in relation to the price data.
// Creating Custom Overlay indicator.
CustomOverlay co = new CustomOverlay();
co.LineColor = Colors.Green;
co.Offset = 10;
_chart.Indicators.Add(co);

co.AddDataValues(myDoubleArray);
Custom Study
Custom Study creates a custom indicator below the price chart in a separate segment. It is composed of one or more lines or histograms, which means the indicator configuration and data addition is done differently from Custom Overlay. AddDataSeries() -method takes an array of double values, as well as information about the indicator type (line or histogram), indicators color, name, and optional bar width used for histograms.
// Creating Custom Study indicator.
CustomStudy cs = new CustomStudy();
cs.Offset = 10;
_chart.Indicators.Add(cs);

cs.AddDataSeries(myDoubleArray, true, Colors.Green, "IndicatorName", 2);
Two Histograms and Line
Two Histograms and Line is a custom indicator which allows showing given data in a separate segment using two histogram and a line. Unlike the other indicators the data isn’t based on the loaded OHLC-dataset. Instead, a separate dataset can be assigned to the indicator.
Properties and methods specific to Two Histograms and Line:
- LineSeriesTitle Sets the title for the indicator line.
- HistogramColor1 / HistogramColor2 Sets the color for the bars in the respective histogram.
- HistogramWidth1 / HistogramWidth2 Sets the width for the bars in the respective histogram.
- HistogramTitle1 / HistogramTitle2 Sets the title for the respective histogram.
- HistogramsStacked When enabled, the two histograms are stacked on top of each other.
- AddLine() Adds the line to the indicator. Needs a DateTime array, Y-value array, line width and color as parameters. Note that this should be called after the indicator has been added to the chart’s indicator collection.
- AddHistogram() Adds a histogram to the indicator. Needs a DateTime array, Y-value array, bar width, color and histogram index as parameters. The last parameter accepts values 1 and 2. The number indicates which histogram should be added or updated. Note that this should be called after the indicator has been added to the chart’s indicator collection.
 A custom indicator, Two Histograms and Line
Nested indicators
From Trader version 3.0 (LightningChart v 12.4) onwards, TradingChart has nested indicators feature. This allows indicators to use other indicators as a basis of their calculations instead of just the price data. For instance, A Simple Moving Average can be set to be based on a Relative Strength Index, causing it to be drawn on top of that instead of on top of the price data.
SetSource() -method can be used to assign indicators as sources for other indicators. The method also accepts OhlcField enumerator value in case user wants the indicator to use other values besides Close values as a source.
// Setting Relative Strength Index as the source for the Simple Moving Average.
// Both indicators have been created earlier in the code.
sma.SetSource(rsi);

// Set Simple Moving Average to be based on High values instead of Close values.
sma.SetSource(OhlcField.High);
If the contents of the chart’s Indicators list are known, it can also be used to set the source.
(_chart.Indicators[0] as SimpleMovingAverage).SetSource(_chart.Indicators[1], 0);
 Simple Moving Average based on Relative Strength Index.
SetSource() also takes an optional seriesIndex parameter. This is used when the source indicator consists of more than one component. For example, seriesIndex can be used to control whether an indicator uses Bollinger Band’s upper, mid, or lower band as the source.
Note that if an indicator’s formula uses more than one OHLC-data fields, the source will replace Close values in it. In case Close values are not used, High values are replaced instead.
Nested indicators feature is not available for custom indicators or Open Interest. Furthermore, indicator cannot be set to its own source.
Drawing tools
Drawing tools are visual tools which can be freely drawn on the TradingChart. All drawing tools, except FreehandAnnotation, are based on one or more control points. The first point is set when drawing a drawing tool has started. The next control points are set when the chart is left-clicked. These control points can also be moved by dragging them after they have been set. Drawing tools are drawn and updated in real-time during drawing and while control points are being moved.
 Trend line has been drawn. Control points can be seen at both ends of the line.
Adding drawing tools
TradingChart has a build-in drawing tool menu for drawing tools, located in the toolbar to the left of the chart. Opening the menu and selecting a drawing tool instantiates the respective drawing tool and enters drawing mode, meaning that left-clicking the chart adds the first control point. Afterwards, each click adds another control point until all points are drawn.
Drawing tools can also be drawn by calling their StartDrawing() method. After the method has been called, drawing is started as soon as the chart is left-clicked, which then sets the first control point.
// Start drawing a yellow Trend line.
TrendLine trendLine = new TrendLine();
trendLine.LineColor = Colors.Yellow;
_chart.DrawingTools.Add(trendLine);
trendLine.StartDrawing();
Adding drawing tools in code behind works similarly to adding technical indicators. TradingChart has DrawingTools list which is used to store all the drawing tools. However, since drawing tools are drawn based on two control points, these points have to be set via SetControlPointsAndDraw() -method.
// Adding a drawing tool in code behind
FibonacciArc fibonacciArc = new FibonacciArc();
fibonacciArc.FillEnabled = true;
_chart.DrawingTools.Add(fibonacciArc);
// Setting control points.
fibonacciArc.SetControlPointsAndDraw(
    new Point(10, 200),
    new Point(20, 300)
    );
Note that drawing tool has to be added to DrawingTools collection before setting its control points. Furthermore, it is currently not possible to add FreehandAnnotations in code behind.
Removing drawing tools
Drawing tools can be removed by highlighting one of the control points via mouse over and pressing Delete key. Removing drawing tools in code is done similarly to indicators (see Removing indicators). There is also DisposeAllDrawingTools() -method, which removes all drawing tools from the chart.
// Clears and disposes all drawing tools.
_chart.DisposeAllDrawingTools();
When new trading data is set to chart or when time range is changed via time range buttons, all drawing tools are by default automatically cleared. AutoClearDrawingTools -property controls this functionality. Its default value NewDataAndTimeRange causes the above behaviour. Setting the property to NewData option clears drawing tools when a new data set is loaded, but not when time range is changed. None prevents all automatic clearing (calling DisposeAllDrawingTools() -method still works).
// Clear drawing tools when new data set is loaded but not when time range is changed.
_chart.AutoClearDrawingTools = ClearDrawingTools.NewData;
List of Drawing tools
There are several properties that all drawing tools have.
Common drawing tool properties:
- LineColor Set the color of all the lines the drawing tool has. Affects also control points.
- LineWidth Set the width of all the lines the drawing tool has. Affects also control points.
- LabelColor If the drawing tool has text labels, changes their color.
- Magnetic When enabled, the drawing tool lines are automatically attached to the nearest OHLC-value in vertical direction. Disabled by default.
- LimitYToStackSegment If enabled, the drawing tool is clipped outside the main segment.
Elliot Wave
Elliot Wave draws a wave pattern between several control points.
Properties specific to Elliot Wave:
- WaveType Changes the type of the wave. The wave types differ in length and in the markings used.
 Elliot Wave has been drawn to the chart.
Fibonacci Arc
A trend line is drawn between two control points, followed by multiple arcs intersecting the line at levels 38.2%, 50.0%, 61.8% and 100%. The arcs are centered on the second control point.
Properties specific to Fibonacci Arc:
- FillEnabled When enabled, the areas between the arcs are colored.
- LabelDistance Controls how far in pixels the labels are from their respective arc lines.
- FullCircle When enabled, the arcs are drawn as full circles.
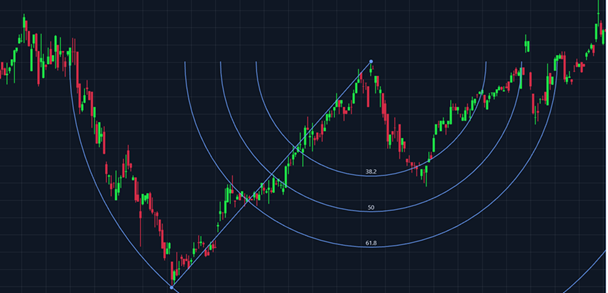 A Fibonacci Arc has been added to the chart.
Fibonacci Fan
Draws a trend line between two control points, then several Fibonacci fan lines starting from the first point and crossing an “invisible” vertical line at the X-value of the second point based on Fibonacci levels at 38.2%, 50.0% and 61.8%.
Properties specific to Fibonacci Fan:
- FillEnabled When enabled, the areas between the fan lines are colored.
- LabelDistance Controls how far in pixels the labels are from their respective fan lines.
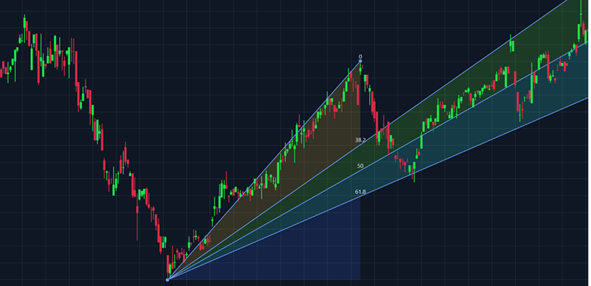 A Fibonacci Fan with colored fills enabled (FillEnabled = true).
Fibonacci Retracements
Draws a trend line between two control points, then several horizontal retracement lines based on selected price range (height) of the trendline. The retracement lines are drawn at Fibonacci level of 38.2%, 50.0% and 61.8%.
Properties specific to Fibonacci Retracements:
- FillEnabled When enabled, the areas between the retracement lines are colored.
- LabelDistance Set how far in pixels the labels are from the respective retracement lines.
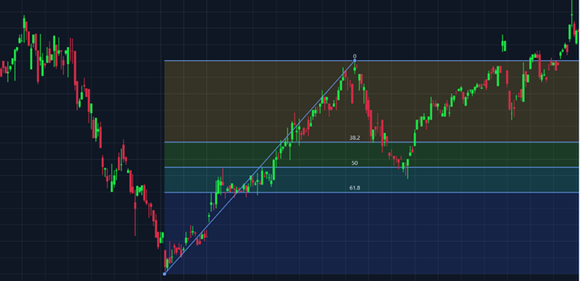 Fibonacci Retracements with colored fills enabled (FillEnabled = true).
Freehand Annotation
Draws a polygon of any shape based on the mouse movement. A text can be shown inside the polygon.
Properties specific to Freehand Annotation:
- FillColor Changes the fill color of the annotation
- BorderColor Changes the border color of the annotation
- BorderWidth Changes the border width of the annotation
- FillEnabled When enabled, fills the annotation with color set via FillColor.
- ShowText When enabled, shows a text inside the annotation. The location of the text is calculated automatically to be in the center of gravity.
- AnnotationText Sets the text to be shown when ShowText is enabled.
- TextColor Sets the color of the text.
- FontSize Sets the font size of the text.
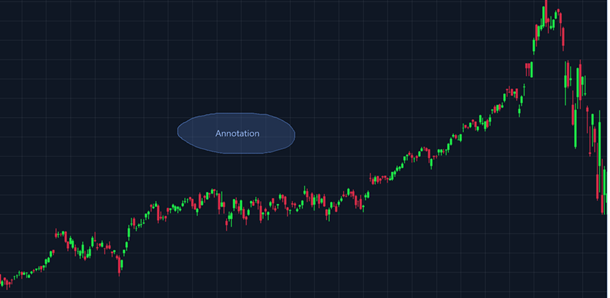 A Freehand Annotation has been drawn. A text is shown in the center of the annotation (ShowText = true).
Head and Shoulders
Head and Shoulders pattern draws a baseline with three peaks.
Properties specific to Head and Shoulders:
- FillColor Changes the fill color of the peak areas.
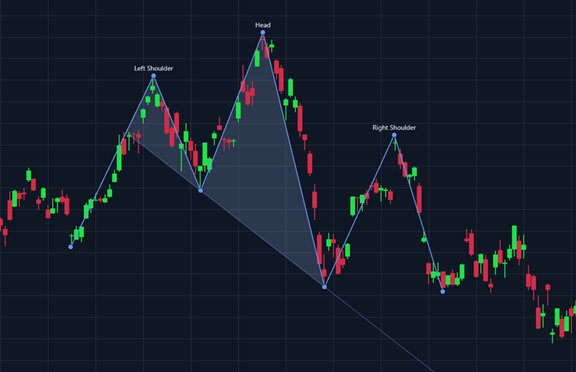 Head and Shoulders pattern in a trading chart
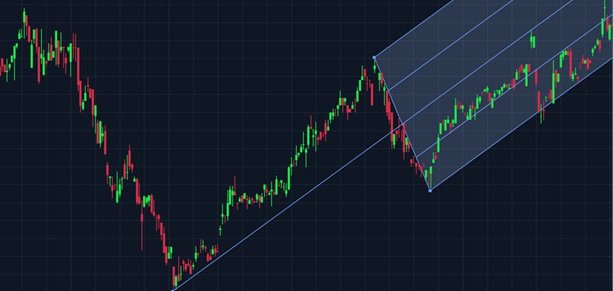
Linear Regression
Calculates and draws a linear regression line between two control points. Then draws two channel lines, one above and one below the regression line based on the selected channel type.
Properties specific to Linear Regression:
- ShowExtensions When enabled, draws dashed extension lines which extend to the last value of the loaded trading data.
- FillEnabled When enabled, colors the areas between the channel and the regression line.
- ChannelType Determines the used Linear Regression Channel type such as standard deviation channel, Raff channel and regression line only.
- NumberOfStandardDeviations Sets the number of standard deviations defining how far the channel lines are from the regression line. Has effect only when ChannelType is set to StandardDeviations.
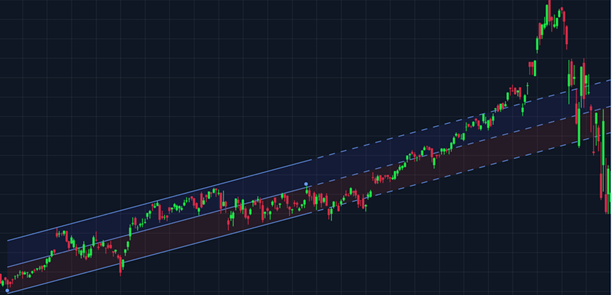 A Linear Regression Channel based on one standard deviation, ChannelType = StandardDeviations, NumberOfStandardDeviations = 1.
Pitchfork
Pitchfork, also known as Andrews Pitchfork, can be used to identify support and resistance levels for a stock's price. It places three control points on the chart and draws a line from the first point through the midpoint of the other points.
Properties specific to Pitchforkn:
- FillColor Changes the fill color of the area between the Pitchfork lines.
 Pitchfork has been added tot he chart.
Trend Line
Draws a straight line between two control points.
Properties specific to Trend Line:
- ShowExtensions When enabled, draws dashed extension lines which extend to the first and the last value of the loaded trading data.
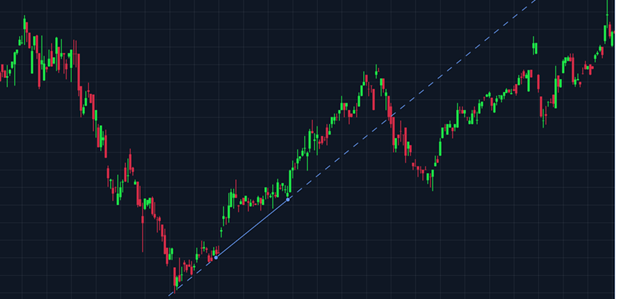 Trend Line with extensions enabled (ShowExtension = true).
Triangle
Draws a triangle based on three control points.
Properties specific to Triangle:
- FillColor Changes the fill color of the Triangle.
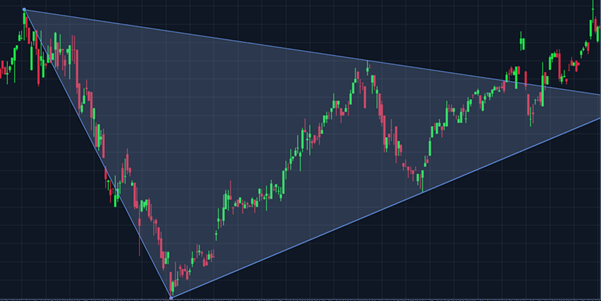 Triangle on a trading chart.
XABCD Pattern
Draws a five-points pattern to the chart.
Properties specific to XABCD Pattern:
- FillColor Changes the color XAB- and BCD-areas of the pattern.
- ShowRatios When enabled, shows ratio values between various legs. Set true by default.
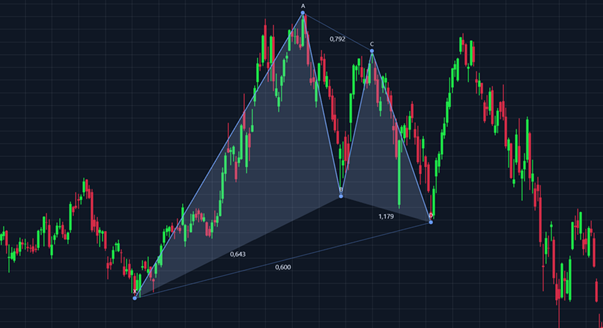 XABCD Pattern has been added to the chart. ShowRatios is enabled.
Other available drawing tools
- Arrow
- Cross Line
- Cycle Lines
- Date Range
- Ellipse
- Fibonacci Extension
- Fibonacci Time Zones
- Flat Top/Bottom
- Horizontal Line
- Horizontal Ray
- Parallel Channel
- Plain Text
- Price Range
- Rectangle
- Sine Wave
- Text Box
- Vertical Line
TradingChart troubleshooting
TradingChart automatically shows some error messages when something is not working as expected. The messages are displayed on top of the chart as well as in Visual Studio’s output window. The error text above the chart is removed when it is either clicked or a new data set is loaded to the chart.
 An error message is displayed above the chart.
It is possible to disable the error messages shown above the chart via ShowErrorMessages property in which case they are shown only in the output window.
// Do not show error messages above the chart.
_chart.ShowErrorMessages = false;
Error list
Below is a list of several error messages, possible reasons for them, and how they could be fixed. Note that the list does not contain every possible error. In case an error cannot be solved, contact LightningChart’s technical support at [email protected].
Message: “Unable to obtain data from provider.”
Explanation: TradingChart cannot connect to data provider and therefore cannot fetch any data.
Possible fix: Ensure that Internet connection is working.
Message: “No data for given time range.”
Explanation: There is no trading data found for the given time range.
Possible fix: Try using a different time range.
Message: “Time range set to: start time – end time”
Explanation: This is not an actual error. Instead, it informs that the time range was changed, but the change is not visible because there is no data loaded to the chart.
Possible fix: Call SetTimeRange() after a data set has been loaded. Alternatively, just load a new data set from a provider in which case the previously set time range will be used.
Message: “End time should be after start time.”
Explanation: Time range is set incorrectly when setting it manually.
Possible fix: Ensure that the start date of the time range is before the end date.
Message: “Data array contains no points.”
Explanation: This message occurs only when SetData() -method is called in code while being given an empty data array.
Possible fix: Ensure that the OhlcData -array given to SetData() is not null or empty.
Message: “Data contains empty values.”
Explanation: This is more of a warning that an actual error message. It means that the loaded OHLC-data set contains at least one empty value, either Open, High, Low, Close or Volume field has a string value of “”. Note that zero does not count as an empty value and will be drawn on the chart.
Possible fix: This message does not prevent TradingChart from working. The data will be loaded and drawn normally, but the empty values will be skipped. It is up to user to implement a logic to handle these cases if necessary.
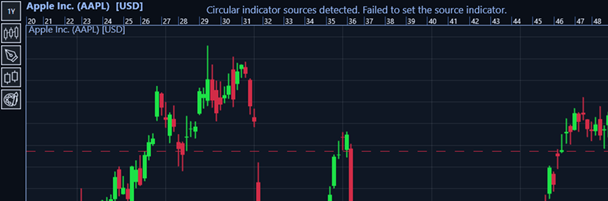
Message: “Circular indicator sources detected. Failed to set the source indicator.
Explanation: This message appears if two or more indicators are using each other as sources when using nested indicators feature.
Possible fix: Check what sources the indicators are using. Avoid situations where indicator A uses Indicator B as source while B uses A as source.
Message: “Problem with connection to Arction server.”
Explanation: TradingChart cannot fetch required license information from LightningChart’s server.
Possible fix: This error most likely is not caused by user. Contact LightningChart’s technical support to receive further information about the current server status.